

When the first coding agents were released I had the naive dream that I could spend time in the garden or in the forest while my agent is doing all the hard stuff.
Like many of you I felt a little betrayed. I got more done and wouldn't have to write all the code myself anymore. Still, I would spend most of the time in front of the chat window and give instructions about what to do next.
And through that I would actually also spend more time in front of the screen, not less.
Wasn't the promise a different one?
Well, yes, but for that we need to do it a little differently, and we need to invest some time upfront before we can stop babysitting the chat.
Let me show you the wonderful world of spec-driven development - that type of development that allows you to go hiking while your agent does the heavy lifting.
Spec-driven what?
In this longer post I will guide you through a single epic we develop together, but after that you will have all you need to start your own journey of spec-driven development.
You'll need the following things to get started:
- A Claude subscription (free is not enough)
- Claude Code installed
- A terminal
- Node.js and npm
- git
- All of your imagination power for the tool we are going to build
Create an application directory on your computer. As we are using Node.js, make sure you name the folder in lowercase without any spaces.
Inside that folder open claude, copy and paste the following prompt:
Create a Hello world boilerplate based on Next.js and Tailwind in this folder. Initialize a git repository if there is none.
If you haven't, make sure to switch Claude Code to auto mode. Press shift+tab until it says auto mode in your terminal.
Enough preparation, let's build something.
What we are building
The application we are going to build is a visa management platform. Every time I travel and have to request a visa I am annoyed by the old school platforms and the bad user experience of those tools.
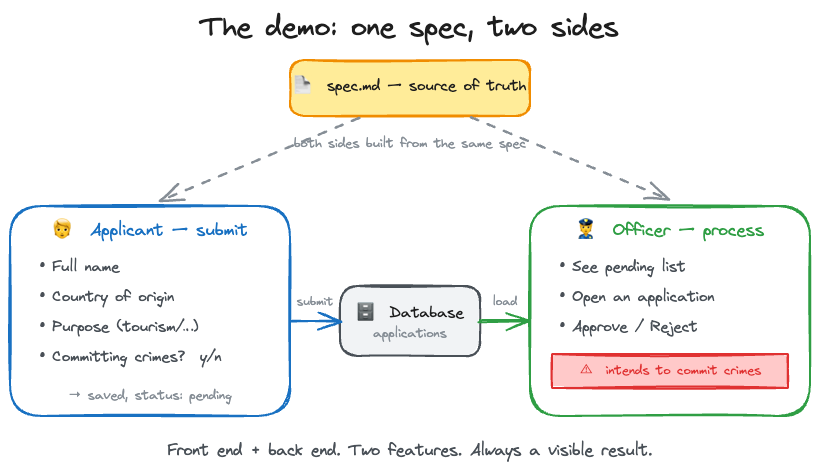
So let's build something cool and simple - and maybe you then sell this to your government.
To get this done I created a short briefing on how the application should work:
# Spec — Mini Visa System

## Goal
A tiny two-sided app: applicants submit visa applications; an officer reviews them.
Deliberately minimal. Applicant and officer views are switchable via a switch on top right.

## Technical Decisions
Use sqlite as a database.

## Form Submission - Applicant Side
**Behaviour:** A form where an applicant enters their details and submits. On submit,
the application is saved to the database and the applicant sees a confirmation.

Fields:
- Full name (required, text)
- Country of origin (required, text)
- Purpose of visit (required, one of: tourism / business / study)
- Interested in committing crimes? (required, yes/no)


Acceptance criteria:
- Submitting a valid form persists one application with status = "pending".
- Required fields are validated before save; errors are shown inline.
- After a successful submit the form clears and shows "Application received".

## Officer view
**Behaviour:** A list of pending applications. The officer opens one and approves or
rejects it. If the applicant is **interested in committing crimes**, a clear warning is shown
before the officer decides.

Acceptance criteria:
- Officer sees a list of all "pending" applications.
- Opening an application shows all submitted fields.
- If interested-in-crimes = yes → a visible warning banner: "⚠ Applicant intends to commit crimes".
- Approve/Reject sets status to "approved"/"rejected" and removes it from pending.


## Out of scope
- Auth / login, payments, email, document uploads, multiple officers.
- Deployment
Also feel free to build your own app right away. What we do here will work for most web applications as well.
Now copy the briefing from above, create a folder named specs and create a file called briefing.md and paste the content in it.
Your directory should look like this by now:
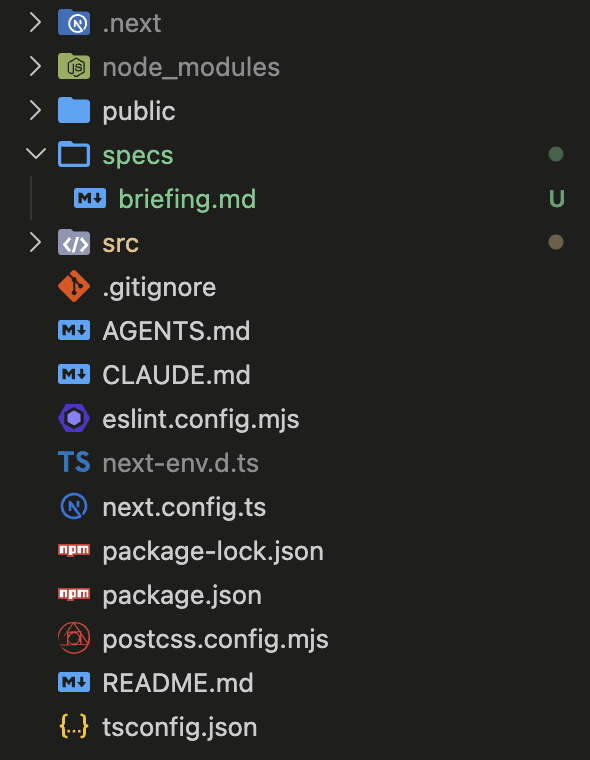
If you wrote the code yourself you would also split up the application into different parts - what we now tell AI to do.
Everything that you now see in a code block is a prompt you can copy and paste into Claude Code.
Based on the @specs/briefing.md please create a roadmap.md file in specs folder, with 2 epics, one for the applicant one for the officer.

Resolve dependencies so that epics can be built and validated independently and incrementally.

Each epic should have a visible deliverable.
And here comes the detail you need to be aware of:
When you don't tell Claude how many epics you want, it will decide for you. And from experience I can tell it tends to overdo it quite a bit, that's why by now I like to decide how we split the epics.
On top of that we are telling Claude we want to have a visible deliverable. For your app it might make sense to first build foundations like databases and some infrastructure, but I like to always have something visual to check if we are going the right direction.
When you have a roadmap.md in your specs folder everything went well. If Claude asks you questions in the chat, also fine, answer them and wait until it writes the roadmap file.
Doesn't that look like a nice roadmap? It doesn't help you if I show you mine as it will look different from yours. As long as you have 2 epics laid out you are good to go.
Claude may now ask you if it should continue to build Epic 1 - that we don't do. For this little app it probably would work like that, but I want to prepare you for the real world.
Our first PRD - let's brainstorm
Now we tell Claude Code to build a PRD, a product requirements document.
Based on the @specs/roadmap.md please create a concise prd for epic 1 in the specs folder. If there are gaps in requirements please ask me questions. Place questions at the end of the PRD. Each question should be provided with four options one of the options should be labeled as recommended based on our briefing and roadmap context. Options should be provided with [ ] so it's easy for me to select an option

For demonstration purposes you are only allowed to ask me 3 questions. For other technical or design decisions stick to industry standards and best practices.
If it's your own product of course you don't limit it at 3 questions. Also make sure your roadmap starts at epic 1. If it starts at 0 you need to write epic 0 here.
A PRD is a well-known format to define requirements. Depending on your team setup you may have it slightly different. If you want to change that later, you can always tell Claude to do so - for this tutorial this is good enough. You can learn more about PRDs here.
When Claude is ready you will have a file named something like prd-epic-1.md in our specs folder. As we didn't specify the name in our prompt it will make up a name. You can avoid that by telling it to use a certain syntax or structure like prd/epic-X.md. We'll tell Claude in a minute.
Open the file and read through it, is this how you would imagine our visa application? If yes, go to the questions at the end of the file. (If not, change the text directly. For this demo I'll leave it like it is.)
Now answer the questions with a X in brackets. In case you don't like the answers, you guessed it, change them.
...
## Open questions

Pick one option per question by changing `[ ]` to `[x]`.

### Q1. How does the top right switch change views?

The briefing says the views are "switchable via a switch" and gives no detail on how that should behave.

- [ ] A. Separate routes, `/` for Applicant and `/officer` for Officer, with the switch as a link toggle. Each view has its own URL and survives a refresh. (Recommended)
- [ ] B. One page with client-side state. Refreshing always returns to Applicant.
- [ ] C. One page with the view held in a query parameter, for example `/?view=officer`.
- [ ] D. One page with client-side state remembered in `localStorage`.

Why A is recommended: Epic 2 replaces a placeholder with real data, and a route of its own keeps the two epics from touching each other's code.

### Q2. What kind of input is Country of origin?
...
When you are done tell Claude to reconcile the questions into statements. We don't want to have any false answers left in there that could later cause the AI to hallucinate.
Answered all questions, now reconcile them into direct requirements in the PRD. For demonstration purposes, don't open another round, fill in the gaps yourself.
This was our first brainstorming. Depending on the complexity of your application this will go on for multiple rounds until there are no gaps left (you need to leave out the demonstration part in a real scenario).
In the next round we don't want to type in all of this again - so let's package this as a skill. And let's fix the naming of the PRD file with it.
Based on how our conversation went, create a skill called brainstorm that will create a simple PRD based on the roadmap if it's not created. It will ask questions to cover large gaps in the requirements and continue reconciling and asking questions until we reach 80% confidence for the PRD. Make sure PRD files are named consistently in the format of `specs/prd/epic-{N}.md` and rename the existing PRD for epic 1 accordingly. Use Claude Code Documentation to create skills. Skill should be created for this project only. Also include to do a commit after each round of questions.
After this we will create a bunch of skills for writing the tech spec, for implementing the code, and for verifying. Therefore let's discuss some details now that apply to all skills:
- Project skills: We create the skill only for this repository because we then can make it super specific for this project and the tech stack in here. A skill for a mobile app looks different than for a web app, one for a customer facing app looks different than for an internal app.
- Confidence level: While this number is made up by the LLM entirely it helps the LLM to challenge itself on the requirements. And it gives us an indicator per epic if we should let Claude jump into implementation.
- Format: We can tell the skill to do all sorts of fancy formatting to our PRDs. We could even tell it to write the PRD to a MCP connection like Jira or Notion once it reaches 80%.
- Documentation: It always pays to hint Claude to its own documentation. Because the model might not know what has changed recently and miss out on features it could use.
- Commit: Just good practice to let the agent version itself. It might screw something up, just like a real engineer.
By now the brainstorm skill should be ready. Run /reload-skills to make it available in your current session.
It's time to clear Claude's brain and let it start fresh. No one likes to work with a cluttered head, not even AI. The command for this is /clear - I know, creative.
Let's create the next skills
Like regular software development, writing code with AI is also a loop.
You brainstorm a feature and refine it into a PRD.
You figure out how to implement the idea technically and how to make sure you can test it behaves the way it should.
You implement it, with all the necessary tests and acceptance criteria you defined before.
You verify it. You make sure a user can actually click through, not only by tests, but also by an agent using a real browser.
For the first one we already have a skill, for the other ones we create them now. You can open multiple Claude sessions in parallel and paste them in.
Write spec skill
Based on Claude Code Documentation, please create a new skill called "write-spec". "write-spec" skill will take an input of a PRD file with an epic and will create an epic technical specification. Technical specification should include exact implementation steps to achieve requirements from the PRD and should apply TDD as a part of the development process.

If there are major architectural decisions to make, please add them as open questions at the end of the technical specification file.

Provide four options, with one option labeled as the recommended option. Each option should be provided [ ] so I can select an option. Ask me questions until all major architecture decisions are done for this technical specification.
By now you should realize how creating skills works. You plainly tell it what to do - in your words. You want it to write tests first and write down exact steps? Tell it.
Implement skill
To run this one we need the playwright plugin. Type the following into the chat:
/plugin install playwright@claude-plugins-official
You will be prompted where you want to install it, select your user scope, then you can use it in other projects as well. Also you will need to type /reload-plugins to make sure Claude picks up the plugins - new sessions will have it right away.
Based on Claude Code Documentation, please create a new skill named "implement-epic", that takes an epic name as input, and executes agentic flow based on this prompt:

implement the technical specification of the given epic until all requirements of its PRD in `specs/prd/epic-{N}.md` are implemented and confirmed.

Follow this workflow:
1. Analyze specification.
2. Build tests According to the spec.
3. Implement the requirements.
4. Verify the implementation by running tests.
5. Fix issues until all tests are passing.

When all tests pass, finish Implementation and provide a report with covered AC (done/partly/not done).

Use playwright MCP to validate the epic visuals (use click through mode) at the end of implementation.
One skill /verify-epic is still missing, we will create it once we are done with our first implementation session.
If you still have your sessions from before, make sure to reload your skills with /reload-skills to make them available in your current sessions. New sessions pick them up automatically.
Create our tech spec and implement it
It's time to create our technical specification. In a nutshell it's the same process as with the PRD, just with a focus on the technical implementation. Let's run it.
/write-spec epic 1
It will now map out the exact implementation plan, and like the brainstorm skill place open questions at the end. The file will either be named something like spec, or even be created in an own subdirectory of specs - in my case it created a tech-spec folder there.
If you are curious about the reasoning and thinking of the agent, take some time and read through the file. With this step we make sure the agent thinks about how to write the feature, instead of just winging it on the fly.
Mark your decisions with a X, go back to your chat and tell it done, next, or just run /write-spec epic 1 again. There is no right or wrong. Depending on whether all gaps are closed you will have to answer a second round of questions - don't forget you are speaking to an AI that figures out harder questions. ;)
Time to let the agents work for us
When you are done with your last round of questions, you earned yourself a break and we finally can let the agent take over.
Before you do that, make sure
- your laptop, or computer is connected to power
- auto mode is enabled
- really all questions are answered in your tech-spec
If all that applies, you can start the implementation.
/implement-epic epic 1
While it is running tests, it is normal that browser windows open and close - that's not me accessing your computer.
Now go grab a coffee and let the agent do its magic. See you in a bit.
No, really, go do something different, this is going to take a while.
Let's verify the results
How was the coffee, what did you do? I hope you didn't stare at the screen and watch what exactly the agent did.
Don't even get used to that. Anyways, let's check the result.
Open http://localhost:3000/ in your browser. If the page doesn't load, (restart) your server in a separate terminal by typing:
npm run dev
Now the application in your browser should look like this:
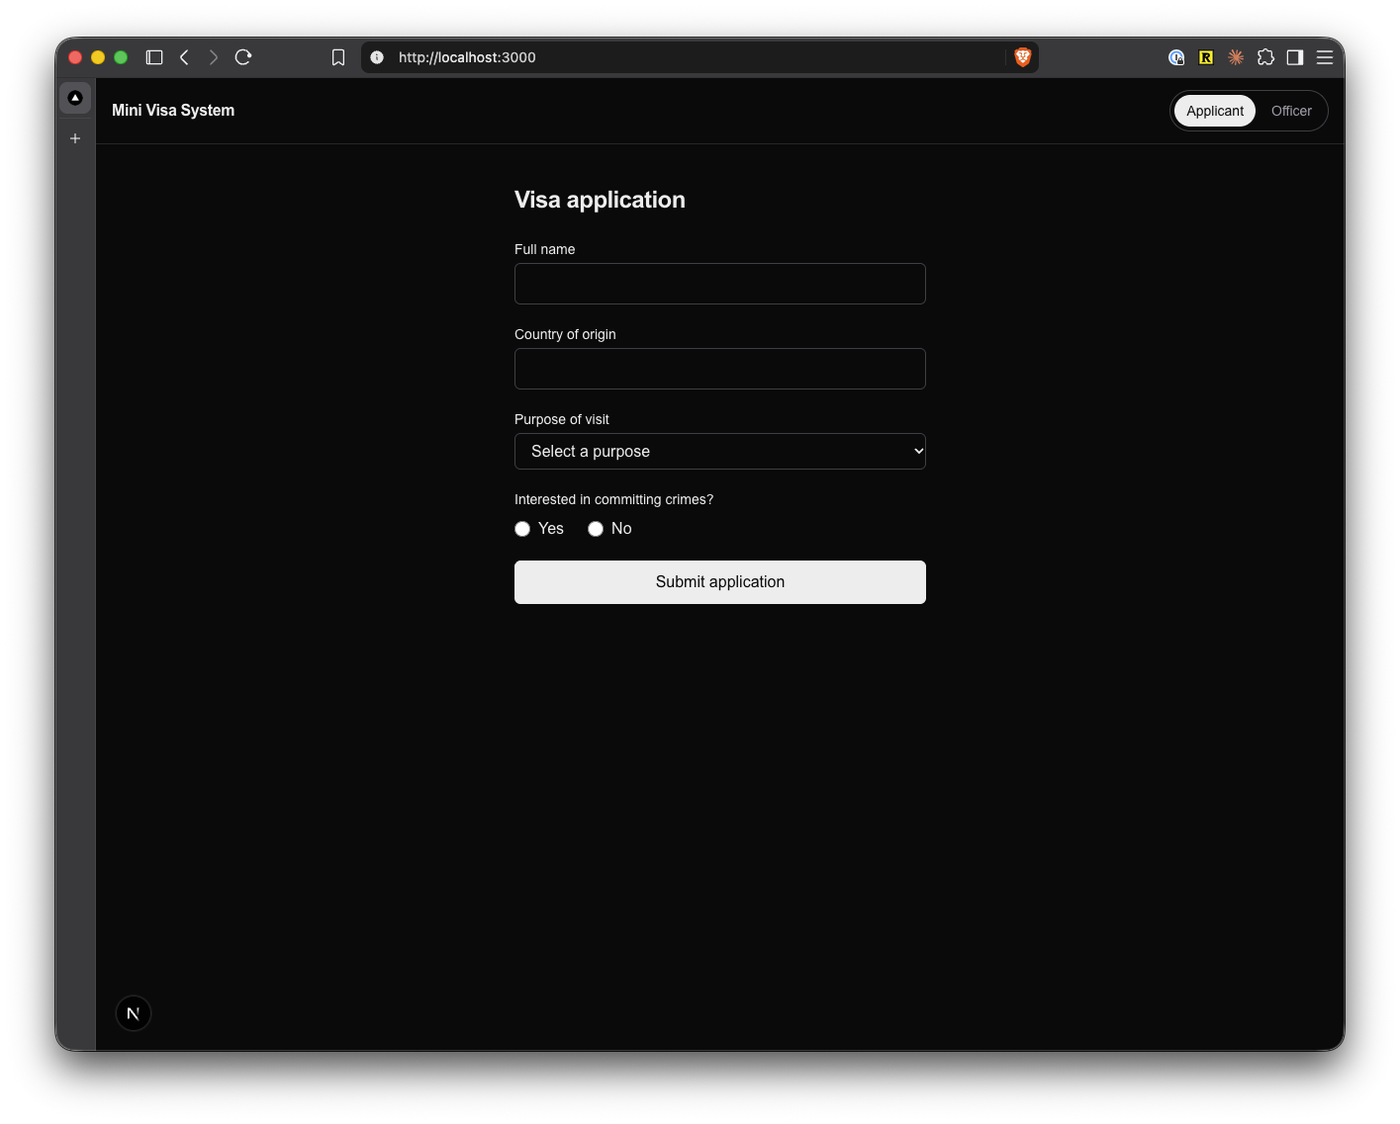
Of course it's important you also use and test your app yourself, but do you want to really always test everything? Me neither. That's why we have tests, and we can let the AI run through as well to make sure our epic didn't break anything.
On the way there I want to teach you another thing - how to update your skills. Because the time will come where you want to have a progress tracker in the implement skill, or you want to have Slack messages when it's done, or you want to have updates in Jira, ...
When we created the /implement-epic skill we said we want it to walk through with Playwright and run tests. But now we don't want that anymore, as we are about to create the /verify-epic skill that does all of that and more.
It's as easy as telling it. When we now create the skill for verifying the epic, we tell it in the second paragraph to "reduce all unnecessary testing in the implement-epic skill".
Please create a new skill verify-epic, that will execute relevant epic tests (unit/integration/functional/e2e) and run playwright feature click through. If I pass key --screenshots I want that playwright takes screenshots and places them into e2e/screenshots folder.

verify-epic skill should take epic name as input parameter and operate with the selected epic, and wire verify-epic skill into implement-epic skill so that at the very end of implementation it runs full epic QA. You can reduce unnecessary testing that is currently present in the implement-epic skill that will be covered by this change. During step/task implementation we should execute only light weight testing, not full epic e2e test suite.

Make sure that we run verify epic skill, at the very end of implement epic skill, and based on the verify epic skill we fix all issues until it's done.
And this is how you can change all skills simply by telling the AI what to do.
If you want all skills to maintain a status.md in the specs folder, tell Claude.
Now once you created the skill, let's run it and see if the tests go well.
/verify-epic epic 1 --screenshots
Get ready for some windows popping up again. And since we passed --screenshots you will also find screenshots in the e2e folder - which can be handy for further development. Also you might see how it tested the application in different resolutions - all things you can make more explicit by customizing your skill to what you actually need.
Want to make it even cooler? Figure out how to let Claude create a video of the test run and save it to a folder in your repo.
Epic 2?
Epic 2 I will leave up to you. It's exactly the same workflow.
You first /brainstorm epic 2 and make sure the agent gets what you want to implement.
After there are no questions open you can create the tech spec with /write-spec epic 2. Same here, you answer the questions until there are none before you hand it off to /implement-epic epic 2.
And then it's time for the next coffee or a break. Don't get used to watching the agent work. Otherwise you gain nothing from AI.
About /verify-epic, do you need to run that? No, as we told it during skill creation to always make sure it runs after /implement-epic. If that for some reason doesn't work, I would first look into .claude/skills/verify-epic/SKILL.md and check if disable-model-invocation is set to true and would set it to false.
You will figure out what that means, if not, ask Claude. ;)
And after Epic 2, think about what else you build into your tool and run /brainstorm epic 3.
Closing thoughts
That's the end. You are now armed with the basics for Agentic Engineering or Spec-Driven Development. But that's only the start.
You will discover so many possibilities from here on. The most important part is that you experiment and go through those skills again and again and improve them where you can.
The workflow I have shown you isn't perfect. The filenames for the spec aren't ideal, they aren't sorted into one directory per epic... well should this even be in files at all or in tickets in Jira or Linear?
And that's on purpose. These four skills are a starting point. You start here and customize as you go.
The alternative is to use a heavier solution like spec-kit or any other available harness and spend a while understanding it rather than just getting something done. The approach you learned here today you can use right away in an existing repository as well.
Also, you noticed we never looked at the code. You can do that at any time, and I bet you will be positively surprised. I am not here today to argue about code quality, but to show you how spec-driven development can work.
If you made it to the end, I'd be happy to hear from you: How did it play out? What did work? What didn't?
If you want a more immersive experience, I also offer remote and on-site workshops on Agentic Engineering. You can find more here.